Using the "fill" command can make data entry in a spreadsheet much quicker and more efficient. Unfortunately, the "fill" command is hidden in Google Sheets. Here's a quick video demonstrating how to "fill down" in a Google Sheet.
Thursday, November 16, 2017
Friday, November 3, 2017
Change how Voicemail Messages are Played
By default, the district's new Cisco phones add a lot of additional information to the playback of each voicemail message (e.g. the number of the caller, the date and time of the message, the duration of the message). If you receive a lot of voicemail, listening to all of this information for every message can quickly become tedious. Fortunately, it's easy to change how voicemail messages are played back and you can remove some or all of the additional information, making playback much quicker. The settings are a little buried in the menus, so here is how to access them:
- Login to the voicemail box that you would like to change. If you have have access to multiple voicemail boxes (e.g. School Office voicemail, Absentee Line voicemail, and personal voicemail), you need to change these settings for each mailbox
- Once you start to hear the voice of the phone attendant, press "0" on the phone dialpad for "Additional Options"

- Press "4" to "Change Mailbox Settings"

- Press "0" for "Additional Options"
- Press "5" to "To Work with How Messages are Played"

- Press "3" to "Choose How Voice Messages are Played"

- Press "2" to "Set Which Components of the Header WIll be Played"

- Press "1" to stop including "Sender Information", press "2" to stop including "Date and Time Information", or press "3" to stop including "Message Duration Information"
- When you're finished making adjustments, hang up the phone or press the "End Call" button
You can change these settings at any time, so feel free to try different options until you find the combination of information that works best for you.
Change Cisco Phone Ringtone
If you don't like the default ringtone of the district's Cisco phones, you can easily change it to to something else. In fact, you can even set different ringtones for different lines on the phone (i.e. one ringtone for outside calls and a different ringtone for internal calls).
Here's a quick video demonstrating how to change the ringtone on a Cisco phone.
Friday, September 15, 2017
Using the "Share" button icons to quickly check Doc sharing levels
If you use Google Docs (and Sheets and Slides), you've most likely used the ever present blue "Share" button quite a bit. Sharing a Doc, Sheet, or Slide allows you to easily collaborate with others or simply share information. However, it's important for ALL staff to be careful and mindful not to share confidential or sensitive information with anyone that does not have a legitimate need (and legal right) to have access to it.
Did you know that the icon that is displayed on the blue "Share" button actually can give you a good overview of if and how widely a Doc, Sheet, or Slide is shared?

Below is a simple guide to what those icons mean:


 This is how it looks in the "Sharing settings"

 This is how it looks in the "Sharing settings"

 This is how it looks in the "Sharing settings"

Hopefully, this helps you more quickly identify the sharing level of your Google Docs, Sheets, and Slides. Coming next, a deeper dive into the "Sharing settings" themselves and how you can utilize them.
Did you know that the icon that is displayed on the blue "Share" button actually can give you a good overview of if and how widely a Doc, Sheet, or Slide is shared?

Below is a simple guide to what those icons mean:
Private
If a "padlock" icon is displayed on the "Share" button, the Doc, Sheet, or Slide is not currently shared with anyone. This is the default for all newly created Docs, Sheets, and Slides and is the most private and secure option.
This is how it looks in the "Sharing settings"

Shared with specific people
If a "people" icon (two heads) is displayed on the "Share" button, the Doc, Sheet, or Slide is currently shared with specific people (or a specific person). The creator of the document must make a purposeful decision to share it with specific people by clicking the "Share" button and entering their email addresses. The specific people have either "View", "Comment", or "Edit" access, depending upon the level given by the document creator. This is the ONLY secure way to share confidential or sensitive information!
This is how it looks in the "Sharing settings"

Smithfield Public School can find and access
If a "building" icon is displayed on the "Share" button, the Doc, Sheet, or Slide is currently shared with all users within Smithfield Public Schools. This includes Smithfield STUDENTS. Be careful when using this option and it should NEVER be used with confidential or sensitive information! This is a good option for documents that should be accessible for all Smithfield staff and students, but don't necessarily need to be public.

Anyone with the link
If a "person with a link" icon is displayed on the "Share" button, the Doc, Sheet, or Slide is currently shared and accessible publicly on the internet. This means that ANYONE who clicks the link can access the document. This option should NEVER be used with confidential or sensitive information! This is a good option for documents that should be publicly available, but there really isn't a reason to make the documents findable using any internet search engine (e.g. Google, Bing, DuckDuckGo, etc.)

Public on the web
If a "globe" icon is displayed on the "Share" button, the Doc, Sheet, or Slide is currently shared and accessible publicly on the internet. These documents also can be found by using any internet search engine (e.g. Google, Bing, DuckDuckGo, etc.) This option should NEVER be used with confidential or sensitive information! This is a good option for documents that should be publicly available (e.g. open meeting minutes).

Hopefully, this helps you more quickly identify the sharing level of your Google Docs, Sheets, and Slides. Coming next, a deeper dive into the "Sharing settings" themselves and how you can utilize them.
Sunday, August 27, 2017
Starting off the new school year with Google Classroom
As we start the 2017-18 school year, it's a great time to start fresh with Google Classroom, even if you haven't used it in the past. If you have students with Chromebooks, Classroom is an efficient way to organize and facilitate how you and your students work and collaborate together. Here are just a few ways you can use Classroom to integrate and utilize technology with your students:
- Organize important information and resources where all students can easily access them
- Quickly share links to websites for your students
- Post questions for whole class or small group discussion
- Integrate quick formative assessments into lessons and get instant access to student responses
- Electronically distribute and collect assignments
- Provide meaningful feedback on student work more quickly
- Differentiate tasks, questions, and assignments to flexible groups of students
- Keep parents and guardians involved with what is happening in class
Google has created a new Training and Resource site specifically to help teachers get up and running with Classroom. Check out some of the tutorials and we will be sending out lots of additional tips and tricks during the first few weeks of school!
Wednesday, April 5, 2017
Accessing the PARCC Practice Tests
If you would like to use the PARCC Practice Tests and Tutorials with your students, here are instructions on how to use the TestNav app on a Chromebook to access the PARCC Practice Tests. You can also share the Practice Tests with parents by sending them a link to http://parcc.pearson.com/practice-tests/
- IMPORTANT: Students should NOT login to the Chromebook using their Smithfield Google account. Instead, students need to click the “Apps” button at the bottom of the screen and click “TestNav”

- If the Chromebook has NEVER been used for PARCC testing or the PARCC Practice Tests, the students will see a screen asking them to select their assigned test. The students need to choose “PARCC Training”. IF the students do NOT see a screen asking them to select their assigned test, skip to Step 4

- A “Sign In” screen will appear. Students need to verify that “PARCC Training” appears at the top. If it doesn’t, they will need to re-select the assigned test in the next step

- IF the students do NOT see “PARCC Training” displayed at the top of the “Sign In” screen, they will need to click on the “Person” icon at the top of the screen and click “Choose a different customer”. The students will then need to select “PARCC Training” (STEP 2)

- At the PARCC Training Sign In screen, click the "Practice Tests" link

- Select a Content Area, select a grade level, and select a test unit

- Click "Start Test Now" (no need to enter a name)

- Click "Start Section"

- Once students are done with the Practice Test, they should click on the User Dropdown Menu (the person icon) and click "Sign out of TestNav"

- To exit the TestNav app, students should hold down the power button on the Chromebook until the screen goes black


Monday, March 27, 2017
3 Steps to Make Sure Chromebooks are Ready for Testing
In order to reduce possible technology issues during testing, it's important to check a few things on the students' Chromebooks to make sure that they are ready to go. There are three things to check; making sure that the Chromebooks are up to date, making sure the Pearson TestNav app is working, and making sure that the Chromebooks' headphone jacks are working. The steps are easy to follow, so you can absolutely work with your students and have them check their own Chromebooks. Here's how:
#1, Make sure that Chromebooks are up to date
Chromebooks typically update themselves automatically, however we have noticed that students (and staff) do not restart their Chromebooks very often which can delay the installation of an update. Here's how to manually check for updates:
- Login to the Chromebook
- Click the status area, where the clock and your user account picture appears

- Click the "Settings" option (the gear icon)

- Click on "About Chrome OS" at the top of the window

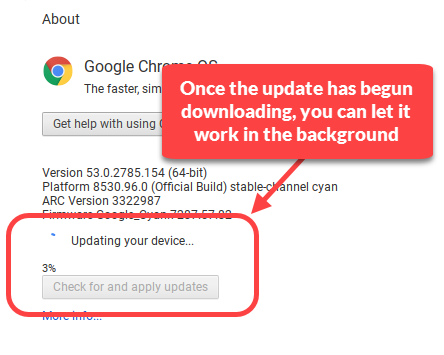
- Click "Check for and apply updates"

- If an update is available, it will begin downloading. When the update is downloading, you can let it continue in the background while you use the Chromebook (Drive, Classroom, Mail, etc.)

- When the update has finished downloading and is ready to install, an "Arrow" icon will appear in the status area next to the clock. Click the "Arrow"

- Click the "Restart to update" to install the update. The process will take 10-15 seconds and then you will be able to log back into the Chromebook

- Repeat this process until there aren't any more updates to install


#2, Make sure the Pearson TestNav app is working properly on each Chromebook
The Pearson TestNav should be automatically installed on each district Chromebook (it is not installed on a student's or staff member's personally owned Chromebook or device). However, it's important for each student to check to make sure that the app is working properly WELL BEFORE testing is scheduled to begin. Here's to how to check the Pearson TestNav app:
- Make sure that the Chromebook is at the login screen. If a student is logged in, they will need to sign out

- Click the “Apps” button at the very bottom of the screen and click “TestNav”

- If the Chromebook has NEVER been used for PARCC testing in the past or for the PARCC Practice Tests, the students will see a screen asking them to select their state. Students should click "Rhode Island"

- A “Sign In” screen will appear with "Rhode Island" at the top. The Chromebook is all set to use the Pearson TestNav app for PARCC testing. Skip to Section #3

- If the Chromebook has been used for PARCC testing in the past, the TestNav app MAY open directly to the "Rhode Island" Sign In screen. If the TestNav app opens directly to the "Rhode Island" Sign In screen, Chromebook is all set to use the Pearson TestNav app for PARCC testing. Skip to Section #3
- If the TestNav app opens to the "PARCC Training" Sign In screen OR opens to another state's Sign In screen, click on the “Person” icon at the top of the screen and select "Choose a different customer"

- Click on "Rhode Island"
- A “Sign In” screen will appear with "Rhode Island" at the top. The Chromebook is all set to use the Pearson TestNav app for PARCC testing


#3, Make sure that each Chromebook's headphone jack is working properly
Students will be required to use earbuds or headphones for portions of the PARCC test in order to hear audio and video passages. It's important for each student to check to make sure that the headphone jack of their Chromebook is working properly WELL BEFORE testing is scheduled to begin. Here's how each student can check the headphone jack of their Chromebook:
- Make sure that the Chromebook is at the login screen. If a student is logged in, they will need to sign out

- Click the “Apps” button at the very bottom of the screen and click “TestNav”

- The TestNav app should open to the Rhode Island Sign In screen

- Plug-in a pair of headphones or earbuds into the Chromebook headphone jack
- Click the "Test audio" link on the TestNav "Sign In" screen and listen in the headphones/earbuds for the test sound

- If the student is able to hear the test sound through the headphones/earbuds, the Chromebook's headphone jack is ready for PARCC testing
- If the student CANNOT hear the test sound, hold down the "Volume up" key on the keyboard to increase the volume and then click the "Test audio" link again

- If the student still CANNOT hear the test sound, try trying a set of headphones/earbuds that are known to be working with another Chromebook
- If the student still CANNOT hear the test sound with the second set of headphones/earbuds, please let the technology department know so we can address the issue


Subscribe to:
Posts (Atom)