Here's how to convert files as you upload them to Google Drive:
- On the computer where your files are stored, open a web browser (Google Chrome works best) and login to your Google Drive
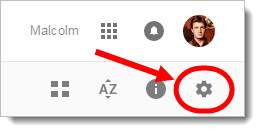
- Once logged into Google Drive, click on the "Gear icon" and then click "Settings"

- Select "Convert uploaded files to Google Docs editor format" and then click "Done"

- Click "New" and click "File upload"


- Select a file to upload and click "Open"

- The file will begin uploading to your Google Drive and converted to Google Docs, Sheets, or Slides format. You should see a small bar at the bottom showing the progress
- Once the upload is completed, you will see the file listed in your Google Drive. The file should display the standard Google Docs icon, not the "W" of Microsoft Word


Here's how to convert an entire folder of files as you upload them to Google Drive:
The process of uploading and converting an entire folder of files is very similar to the process used to convert one file at a time. The key differences are;
- When clicking on "New", select "Upload folder" instead of Upload file

- Select the folder to convert and click "OK"

- All of the files will be converted and uploaded into a folder within Google Drive

- The icons of the converted files will be the standard Google Docs, Sheets, and Slides icons, not the icons of Microsoft Office


Here's how to convert Microsoft Word, Excel, and PowerPoint files that have already been uploaded to Google Drive
- Open (double-click) an existing Microsoft Word, Excel, or PowerPoint file in your Google Drive

- When the files opens, you will notice that the icon in the upper left is the Microsoft icon
- Click on the File menu and select "Save as Google Docs"


- The conversion process will occur. The larger the file, the longer this process can take


- When the converted file opens, you will notice the Google Docs icon in the upper left

- The original Microsoft Office file is preserved alongside the converted version within Google Drive


No comments:
Post a Comment